Current Limiting Resistor Calculator for Leds
-
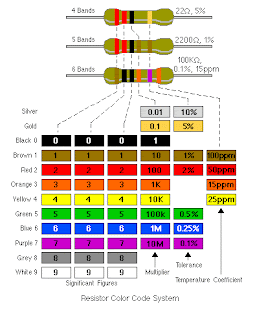
If you want to calculate Resistor, please visit Here!
Some good values to try:
As supply voltage:
For molex: 5, 7 and 12 volts
Batteries: 1.5 and 9 volts
...
7:45 PM
Make a simple solar charger for 4 AA rechargeable batteries
 In this article you will find out how to make a very simple solar battery charger for 4 AA rechargeable batteries using a small 6 Volt solar panel. A labeled photograph of the completed charger is provided at the end of the article.
Here is the parts list:
The Solar Battery Charger Specifications
The long life rechargeable batteries used have a capacity of 2,700mah - therefore a charging current of 10% of this (i.e. 270ma) is safe. The nominal voltage of each battery is 1.2V, so four in series is 4.8V with a fully charged voltage of around 5.2V being normal. Therefore our 6 Volt 250ma solar panel is perfectly rated to be used as a charger for these batteries.
 In order to prevent stored power in the batteries being released through the solar panel during the night, a blocking diode is used. Placed in the postive line from the solar panel this only allows electricity to flow from the solar panel to the batteries and not from the batteries to the solar panel.
Up to 0.7 Volts from the solar panel are lost as heat in the diode as electricity flows from the panel to the battery leaving us with a perfect charging voltage of around 5.30 Volts for the batteries.
Putting the Solar Battery Charger Together
To keep things simple no soldering is required to built this solar battery charger. Instead terminal strip is used to make the connections - only a small flat head screwdriver is required to secure each wire/component in place.
First of all the four batteries are put into the two battery holders and then the holders are wired together in series. To do this the positive lead from one battery holder is connected to the negative from the other. The remaining free wires - one positive and one negative - are our charging inputs.
The ringed end of the blocking diode (pictured above) is then connected to the positive battery input (red), and the other end to the positive output from the solar panel (red). The negative output from the solar panel (blue) is connected directly to the negative battery input (black) .
 Pictured above is the completed Solar Battery Charger. The voltage measured across the points labeled B and C is the voltage coming in from the solar panel.
The voltage measured across the points labeled B and A is the voltage of the batteries. (Note that during charging the battery voltage measured will be higher than the true voltage of the batteries. Cover the solar panel to measure the true battery voltage.)
A suitable multimeter is required to make these measurements.
 In this article you will find out how to make a very simple solar battery charger for 4 AA rechargeable batteries using a small 6 Volt solar panel. A labeled photograph of the completed charger is provided at the end of the article.
Here is the parts list:
- 1 of 4 x 2700mah AA Rechargeable Batteries.
- 1 of 6V 250ma Solar Panel.
- 2 of 2 AA Battery Holder with Flying Leads.
- 1 of Blocking Diode.
The Solar Battery Charger Specifications
The long life rechargeable batteries used have a capacity of 2,700mah - therefore a charging current of 10% of this (i.e. 270ma) is safe. The nominal voltage of each battery is 1.2V, so four in series is 4.8V with a fully charged voltage of around 5.2V being normal. Therefore our 6 Volt 250ma solar panel is perfectly rated to be used as a charger for these batteries.
 In order to prevent stored power in the batteries being released through the solar panel during the night, a blocking diode is used. Placed in the postive line from the solar panel this only allows electricity to flow from the solar panel to the batteries and not from the batteries to the solar panel.
Up to 0.7 Volts from the solar panel are lost as heat in the diode as electricity flows from the panel to the battery leaving us with a perfect charging voltage of around 5.30 Volts for the batteries.
Putting the Solar Battery Charger Together
To keep things simple no soldering is required to built this solar battery charger. Instead terminal strip is used to make the connections - only a small flat head screwdriver is required to secure each wire/component in place.
First of all the four batteries are put into the two battery holders and then the holders are wired together in series. To do this the positive lead from one battery holder is connected to the negative from the other. The remaining free wires - one positive and one negative - are our charging inputs.
The ringed end of the blocking diode (pictured above) is then connected to the positive battery input (red), and the other end to the positive output from the solar panel (red). The negative output from the solar panel (blue) is connected directly to the negative battery input (black) .
 Pictured above is the completed Solar Battery Charger. The voltage measured across the points labeled B and C is the voltage coming in from the solar panel.
The voltage measured across the points labeled B and A is the voltage of the batteries. (Note that during charging the battery voltage measured will be higher than the true voltage of the batteries. Cover the solar panel to measure the true battery voltage.)
A suitable multimeter is required to make these measurements.